
In the world of modern software development, speed, reliability, and automation are non-negotiable. Platforms like Vercel have set a high standard for seamless deployment, but what if you could build your own version using AWS and GitHub? That's exactly what I did—and in this blog, I'll walk you through how I crafted a robust CI/CD pipeline using AWS services, GitHub, and a sprinkle of DevOps magic.
Why Build Your Own CI/CD Pipeline?
While managed platforms like Vercel abstract away complexity, building your own pipeline offers unparalleled control, customization, and learning opportunities. By leveraging AWS services, I wanted to automate every step—from code commits to live deployments—while ensuring security, scalability, and repeatability.
Here's how it works:
The Architecture: AWS + GitHub
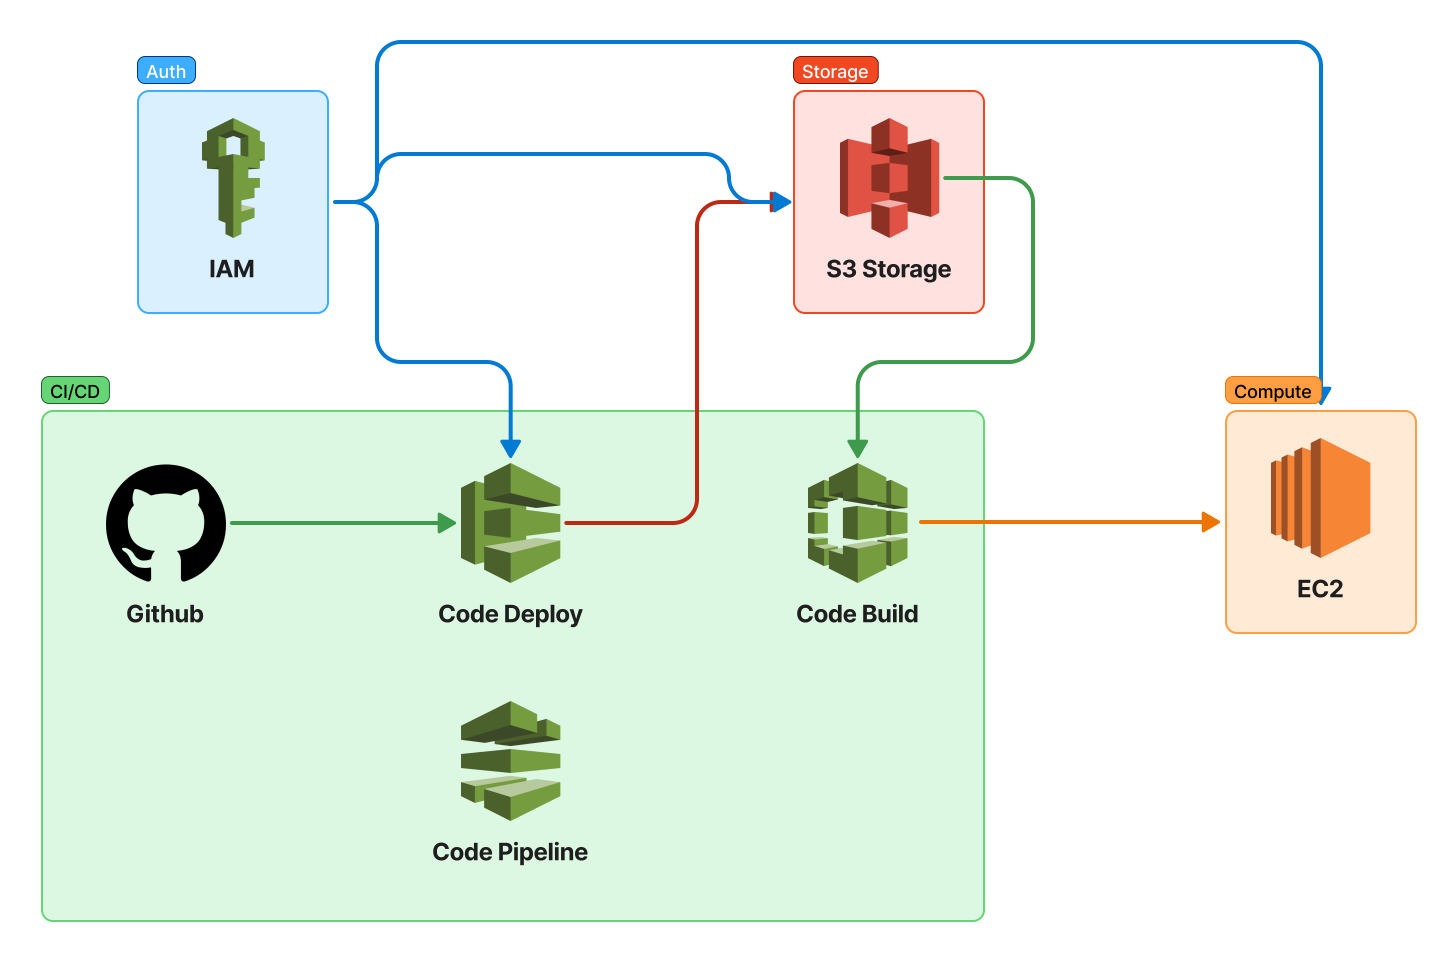
The pipeline revolves around four core AWS services—CodePipeline, CodeBuild, CodeDeploy, and IAM—paired with GitHub for version control. Let's break it down:
- GitHub: The Starting Line
All code lives in a GitHub repository. When a developer pushes changes to the main branch, GitHub acts as the trigger for the entire workflow. This integration ensures that every code change is automatically picked up by AWS CodePipeline.
- AWS CodePipeline: The Orchestrator
CodePipeline is the backbone of the workflow. It detects changes in the GitHub repository and kicks off the pipeline. Think of it as the conductor, coordinating each step:
- Source Stage: Pulls the latest code from GitHub.
- Build Stage: Hands off the code to CodeBuild.
- Deploy Stage: Passes the baton to CodeDeploy.
- AWS CodeBuild: Compiler and Tester
CodeBuild takes the raw code, compiles it, and runs tests. This step is critical for catching bugs early. For example, if your app uses TypeScript, CodeBuild transpiles it to JavaScript. If tests fail, the pipeline halts, preventing broken code from reaching production. To build the code successfully in CodeBuild, your code should have a file buildspec.yml .
version: 0.1

phases:
  install:
    commands:
      - echo Installing NGINX
      - sudo apt-get update
      - sudo apt-get install nginx -y
  build:
    commands:
      - echo Build start on `date`
      - cp index.html /var/www/html
  post_build:
    commands:
      - echo Configuring NGINX

artifacts:
  files:
    - "**/*"
- AWS CodeDeploy: The Deployment Engine
Once the build succeeds, CodeDeploy springs into action. It deploys the application to EC2 instances preconfigured to host your app. CodeDeploy ensures zero downtime by using strategies like rolling updates, and it can automatically roll back if a deployment fails. To deploy the code in CodeDeploy, your code should have a file appspec.yml .
version: 0.0
os: linux
files:
  - source: /
    destination: /var/www/html
hooks:
  AfterInstall:
    - location: scripts/install_nginx.sh
      timeout: 300
      runas: root
  ApplicationStart:
    - location: scripts/start_nginx.sh
      timeout: 300
      runas: root
- EC2: The Hosting Powerhouse
The application runs on AWS EC2 instances, which provide scalable compute capacity. By integrating with Auto Scaling Groups (optional), you can even handle traffic spikes effortlessly.
Setting up AWS CodeDeploy Agent on Ubunty EC2:
In order to deploy the app to EC2, CodeDeploy needs an agent which deploys the code on the EC2 instance. Run the following commands on your EC2 instance:
https://aws-codedeploy-ap-south-1.s3.ap-south-1.amazonaws.com/releases/codedeploy-agent_1.3.2-1902_all.deb - In this link below, change ap-south-1 to your particular availability zone.
sudo apt-get update

sudo apt-get install ruby-full ruby-webrick wget -y

cd /tmp

wget https://aws-codedeploy-us-east-1.s3.us-east-1.amazonaws.com/releases/codedeploy-agent_1.3.2-1902_all.deb

mkdir codedeploy-agent_1.3.2-1902_ubuntu22

dpkg-deb -R codedeploy-agent_1.3.2-1902_all.deb codedeploy-agent_1.3.2-1902_ubuntu22

sed 's/Depends:.*/Depends:ruby3.0/' -i ./codedeploy-agent_1.3.2-1902_ubuntu22/DEBIAN/control

dpkg-deb -b codedeploy-agent_1.3.2-1902_ubuntu22/

sudo dpkg -i codedeploy-agent_1.3.2-1902_ubuntu22.deb

systemctl list-units --type=service | grep codedeploy

sudo service codedeploy-agent status

- IAM: The Security Guard
AWS Identity and Access Management (IAM) ensures every service has just enough access to do its job—and nothing more. For example:
- CodeBuild gets read access to GitHub and write access to storage.
- CodeDeploy has permissions to update EC2 instances. This principle of least privilege minimizes security risks.
Code demo
https://github.com/thearyanthegr8/cicd-pipeline-demo
Challenges and Lessons Learned
- IAM Permissions: Getting IAM roles right took trial and error. Always start with minimal permissions!
- Pipeline Debugging: Use CloudWatch Logs to monitor CodeBuild and CodeDeploy.
- GitHub Webhooks: Ensure your repository's webhook is correctly configured to trigger CodePipeline.
Future Enhancements
This pipeline is just the beginning. Next, I plan to:
- Implement blue-green deployments for safer releases.
- Add canary testing to roll out updates to a subset of users first.
- Integrate AWS CloudFormation for infrastructure-as-code (IaC).
- Intelligent Rollback Strategies: Enhance CodeDeploy to automatically trigger rollbacks if health checks fail or error rates exceed thresholds, minimizing downtime.
- Containerization with Docker & ECS: Package the application into Docker containers for consistent environments and deploy using Amazon ECS or EKS for auto-scaling and better resource utilization.
- Real-Time Monitoring & Observability: Use Amazon CloudWatch to track application metrics (CPU, memory, latency) and AWS X-Ray to trace requests, debug bottlenecks, and visualize service maps.
Conclusion
Building a custom CI/CD pipeline with AWS and GitHub isn't just about automation—it's about empowerment. By understanding each tool's role, you gain the flexibility to adapt workflows to your team's needs. Whether you're a startup or an enterprise, this approach offers a scalable, secure foundation for delivering software faster and smarter.